


こんにちは!Popoです。
こんな方へのお勧めの記事です。
- カメラロールの画像を表示したい
- カメラロールのアクセス方法を知りたい
前回の記事で、UICollectionViewで表示する画像にチェックマークを表示させるカスタマイズを行いました。
表示している画像がProjectに格納している画像のため、今回はカメラロールから画像を取得して表示させたいと思います。
アプリは前回使用したソースコードを流用していきます。

その方がわかりやすいですよね
アプリの動作環境

アプリの開発環境です。
| 項目 | バージョン |
| Xcode | Version 14.3.1 (14E300c) |
| Swift | Swift version 5.8.1 |
| MacOS | macOS Ventura バージョン13.4(22F66) |
カメラロールへのアクセス前提条件
私は「カメラロール」と呼んでいますが、「iPhone」の「写真」の事です。
昔は「iPhone」上の表記も「カメラロール」だったんですよね!
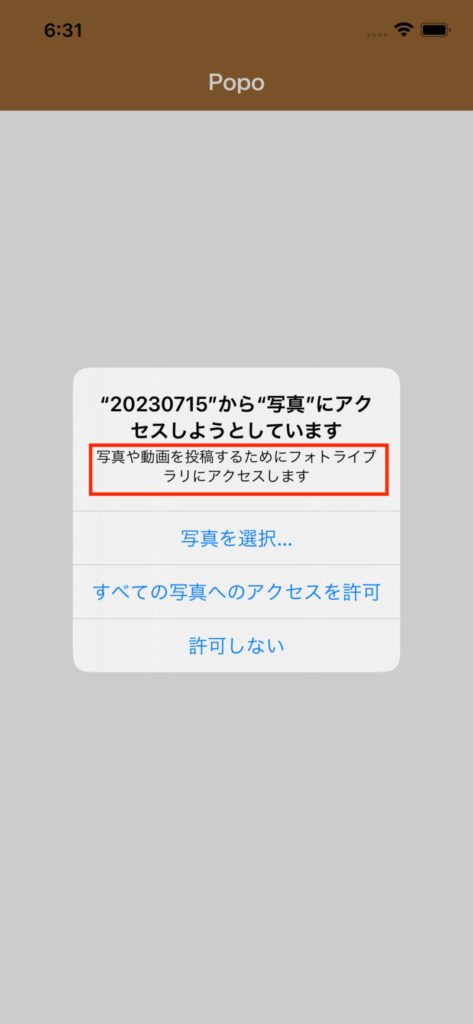
アプリ内からデバイスのカメラロールにアクセスするためには「info.plist」にNSPhotoLibraryUsageDescriptionキーを追加する必要があります。
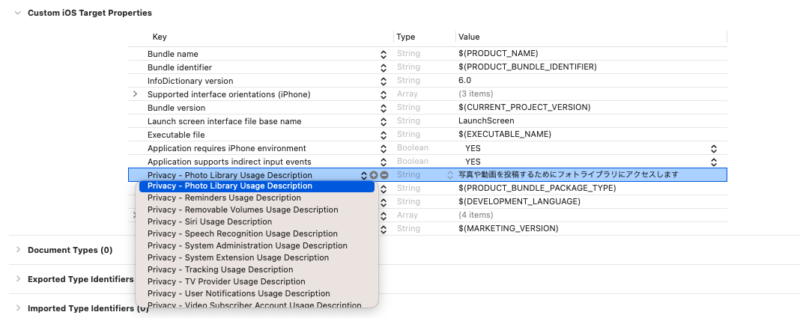
Valueには、アプリ初回起動時に表示されるダイアログのメッセージを入力しておきます。
(2回目以降は、このダイアログは表示されません。)
アプリの設計方針

どのようなApiを使用するか決めておきたいと思います。
「PHPhotoLibrary」「PHAsset」の2つを使用します。
PHPhotoLibrary
「PHPhotoLibrary」の「authorizationStatus」を利用して、ユーザがカメラロールへのアクセスを許可しているかチェックを行います。

PHAsset
「PHAsset」を利用してカメラロールから画像データを取得します。
ソースコードの全体
前回記事からの変更点を赤文字にしています。
OneViewController
主な機能
- ナビゲーションバーカスタマイズ
- UICollectionViewDelegateFlowLayoutの設定
- UICollectionViewの生成
- カメラロールアクセス許可チェック
- カメラロールから画像データ取得
- UICollectionViewDelegate、UICollectionViewDataSourceメソッド
import UIKit
import Photos
import AssetsLibrary
class OneViewController: UIViewController {
//画像格納構造体
struct oneImageStruct {
var savePHAsset: PHAsset
var flag: Bool
}
//表示用配列
fileprivate var oneImgeArray:[oneImageStruct] = []
//
//UICollectionView
fileprivate var photoListCollectionView: UICollectionView!
fileprivate let flagOn:Bool = true
fileprivate let flagOff:Bool = false
override func viewDidLoad() {
super.viewDidLoad()
self.view.backgroundColor = .black
self.navigationItem.title = "Popo"
let attrs: [NSAttributedString.Key: Any] = [
.foregroundColor: UIColor.white,
.font: UIFont(name: "HiraginoSans-W6",size:17)!,
.baselineOffset:1
]
// iOS15以降の場合
let appearance = UINavigationBarAppearance()
appearance.backgroundColor = .brown
appearance.titleTextAttributes = attrs
self.navigationController?.navigationBar.scrollEdgeAppearance = appearance
// CollectionViewのレイアウトを生成.
let layout = UICollectionViewFlowLayout()
// Cell間の最小サイズ
layout.minimumInteritemSpacing = 1
// 行間の最小サイズ
layout.minimumLineSpacing = 1
// セクションのヘッダーサイズ
layout.headerReferenceSize = CGSize(width:0,height:0)
// Cell一つ一つの大きさ.
let photoSize:CGFloat = (SCREEN_WIDTH - 5)/4
layout.itemSize = CGSize(width:photoSize, height:photoSize)
// Cellのマージン.
layout.sectionInset = UIEdgeInsets(top: 1, left: 1, bottom: 1, right: 1)
layout.itemSize = CGSize(width: photoSize, height: photoSize)
// CollectionViewを生成.
self.photoListCollectionView = UICollectionView(frame: CGRect(x: 0, y: 0, width: SCREEN_WIDTH, height: SCREEN_HEIGHT), collectionViewLayout: layout)
self.photoListCollectionView.register(PhotoCollectionViewCell.self, forCellWithReuseIdentifier: "cell")
//複数選択許可
self.photoListCollectionView.allowsMultipleSelection = true
self.photoListCollectionView.delegate = self
self.photoListCollectionView.dataSource = self
self.view.addSubview(photoListCollectionView)
//カメラロールアクセスチェック
self.photolibraryAuthorization()
}
}
extension OneViewController
{
//カメラロールの写真を全て取得
private func getAllPhotosInfo() {
// ソート条件を指定
let options = PHFetchOptions()
options.sortDescriptors = [
NSSortDescriptor(key: "creationDate", ascending: false)
]
let assets: PHFetchResult = PHAsset.fetchAssets(with: .image, options: options)
assets.enumerateObjects { (asset, index, stop) -> Void in
sleep(UInt32(0.05))
let saveOneItem:oneImageStruct = oneImageStruct(savePHAsset: asset as PHAsset, flag: self.flagOff)
self.oneImgeArray.append(saveOneItem)
}
//メインスレッドからアクセス
DispatchQueue.main.async {
self.photoListCollectionView.reloadData()
}
}
//カメラロール アクセス確認
fileprivate func photolibraryAuthorization()
{
if PHPhotoLibrary.authorizationStatus() != .authorized {
PHPhotoLibrary.requestAuthorization { status in
if status == .authorized {
//カメラロールの写真を全て取得
self.getAllPhotosInfo()
} else if status == .denied {
//メインスレッドからアクセス
DispatchQueue.main.async {
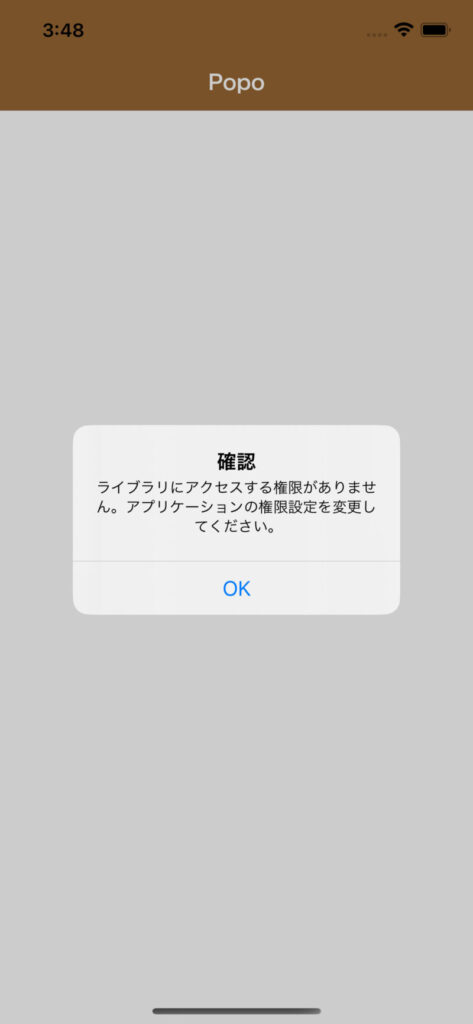
let alertVC = UIAlertController(title: "確認", message: "ライブラリにアクセスする権限がありません。アプリケーションの権限設定を変更してください。", preferredStyle: .alert)
alertVC.addAction(UIAlertAction(title: "OK", style: .default, handler: { (action) in
return
}))
self.present(alertVC, animated: true, completion: nil)
}
return
}
}
} else {
//カメラロールの写真を全て取得
self.getAllPhotosInfo()
}
}
}
//
//MARK: UICollectionView
extension OneViewController: UICollectionViewDelegate, UICollectionViewDataSource, UICollectionViewDelegateFlowLayout
{
func collectionView(_ collectionView: UICollectionView, numberOfItemsInSection section: Int) -> Int
{
return self.oneImgeArray.count
}
func collectionView(_ collectionView: UICollectionView, cellForItemAt indexPath: IndexPath) -> UICollectionViewCell
{
let cell : PhotoCollectionViewCell = collectionView.dequeueReusableCell(withReuseIdentifier: "cell", for: indexPath) as! PhotoCollectionViewCell
//二重に表示されるのを防ぐ
for subview in cell.contentView.subviews{
subview.removeFromSuperview()
}
let index = indexPath.row
let checkFlag:Bool = self.oneImgeArray[index].flag
let workPHAsset:PHAsset = self.oneImgeArray[index].savePHAsset
if checkFlag
{
cell.setConfigure(assets: workPHAsset,flag:self.flagOn)
} else {
cell.setConfigure(assets: workPHAsset,flag:self.flagOff)
}
//
return cell
}
//MARK:UICollectionViewDelegate
//選択された時に呼ばれる.
func collectionView(_ collectionView: UICollectionView, didSelectItemAt indexPath: IndexPath)
{
guard let cell: PhotoCollectionViewCell = collectionView.cellForItem(at: indexPath) as? PhotoCollectionViewCell else { return }
let index = indexPath.row
//選択テーブルにonを設定
self.oneImgeArray[index].flag = self.flagOn
if self.photoListCollectionView.allowsMultipleSelection {
cell.isMarked = self.flagOn
}
}
//選択状態から非選択状態になった時に呼ばれる.
func collectionView(_ collectionView: UICollectionView, didDeselectItemAt indexPath: IndexPath) {
guard let cell: PhotoCollectionViewCell = collectionView.cellForItem(at: indexPath) as? PhotoCollectionViewCell else { return }
let index = indexPath.row
//選択テーブルにoffを設定
self.oneImgeArray[index].flag = self.flagOff
if self.photoListCollectionView.allowsMultipleSelection {
cell.isMarked = self.flagOff
}
}
}
PhotoCollectionViewCell
主な機能
- チェックボックス表示制御
- 表示用UIImageView生成
- チェックボックス用UIViewの生成
- 画像表示メソッド
import UIKit
import Photos

class PhotoCollectionViewCell: UICollectionViewCell {

    //var backView : UIView!
    fileprivate var checkBlueView: UIView!
    fileprivate var checkWhiteView: UIView!

    fileprivate var thumbnailImageView : UIImageView!

    var saveImage:UIImage!

    var isMarked: Bool = false {
        didSet {
            if isMarked {
                self.checkBlueView.isHidden = false
                self.checkWhiteView.isHidden = true
            } else {
                self.checkBlueView.isHidden = true
                self.checkWhiteView.isHidden = false
            }
        }
    }

    override init(frame: CGRect) {
        super.init(frame: frame)
        //チェックボック生成
        let boxSize = frame.width * 0.3

        self.checkBlueView = UIView()
        self.checkWhiteView = UIView()
        //選択時のチェックボックス
        self.checkBlueView = PhotoCheckBlueView(frame: CGRect(x:self.frame.size.width - boxSize, y:self.frame.size.height - boxSize, width:boxSize, height:boxSize))
        //非選択時のチェックボックス
        self.checkWhiteView = PhotoCheckClearView(frame: CGRect(x:self.frame.size.width - boxSize, y:self.frame.size.height - boxSize, width:boxSize, height:boxSize))

        //カメラロール画像表示
        self.thumbnailImageView = UIImageView()

        let rect:CGRect = CGRect(x: 2.5, y: 2.5, width: self.frame.size.width - 5, height: self.frame.size.height - 5)
        self.thumbnailImageView.image = saveImage
        self.thumbnailImageView.frame = rect
        self.thumbnailImageView.contentMode = UIView.ContentMode.scaleAspectFit

        self.thumbnailImageView.addSubview(self.checkBlueView)
        self.thumbnailImageView.addSubview(self.checkWhiteView)

        self.checkBlueView.isHidden = true
        self.checkWhiteView.isHidden = false

        self.addSubview(self.thumbnailImageView)

    }

    required init?(coder aDecoder: NSCoder) {
        fatalError("init(coder:) has not been implemented")
    }
    // 画像を表示する
    func setConfigure(assets: PHAsset,flag:Bool) {

        let targetSize = CGSize(width: self.bounds.width, height: self.bounds.height)
        let manager: PHImageManager = PHImageManager()
        manager.requestImage(for: assets,targetSize: targetSize,contentMode: .aspectFill,options: nil) { (image, info) -> Void in
            if let degraded = info?[PHImageResultIsDegradedKey] as? NSNumber, !degraded.boolValue {

                if image != nil{
                    //画像正方形
                    let saveImage:UIImage = image?.pingMakesquare() ?? UIImage()
                    self.thumbnailImageView.image = saveImage
                }

            } else {

                //何もしない(^^;
            }

        }

        if flag {
            self.checkBlueView.isHidden = false
            self.checkWhiteView.isHidden = true
        } else {
            self.checkBlueView.isHidden = true
            self.checkWhiteView.isHidden = false
        }
    }
    //
}
PhotoCheckBlueView、PhotoCheckClearView
両クラスは前回と変更はありませんので、詳細は前回の記事を参照してください。
アプリの画面動作
アプリの動作を動画にとってみました。
各ロジック解説

今回は追加ロジックを解説いたします。その他のロジックについては前記事を参照してください。
OneViewController
メインのUIViewControllerの説明です。
- 準備
「Photos」「AssetsLibrary」のフレームワークをインポートします。
構造体で「UIImage」の項目を「PHAsset」に変更します。
import UIKit
import Photos
import AssetsLibrary
class OneViewController: UIViewController {
//
//画像格納構造体
struct oneImageStruct {
var savePHAsset: PHAsset
var flag: Bool
}
- カメラロールへのアクセスチェック
カメラロールの画像データを取得するだけのため、簡単に「.authorized」「.denied」だけを判定しています。
「.denied」の場合はエラーメッセージを表示させます。
//カメラロール アクセス確認
fileprivate func photolibraryAuthorization()
{
if PHPhotoLibrary.authorizationStatus() != .authorized {
PHPhotoLibrary.requestAuthorization { status in
if status == .authorized {
//カメラロールの写真を全て取得
self.getAllPhotosInfo()
} else if status == .denied {
//メインスレッドからアクセス
DispatchQueue.main.async {
let alertVC = UIAlertController(title: “確認”, message: “ライブラリにアクセスする権限がありません。アプリケーションの権限設定を変更してください。”, preferredStyle: .alert)
alertVC.addAction(UIAlertAction(title: “OK”, style: .default, handler: { (action) in
return
}))
self.present(alertVC, animated: true, completion: nil)
}
return
}
}
} else {
//カメラロールの写真を全て取得
self.getAllPhotosInfo()
}
「PHFetchOptions」を指定していますが、画像データが取得できれば良いので今回は特に意味はありません。😓
//カメラロールの写真を全て取得
private func getAllPhotosInfo() {
// ソート条件を指定
let options = PHFetchOptions()
options.sortDescriptors = [
NSSortDescriptor(key: “creationDate”, ascending: false)
]
let assets: PHFetchResult = PHAsset.fetchAssets(with: .image, options: options)
assets.enumerateObjects { (asset, index, stop) -> Void in
sleep(UInt32(0.05))
let saveOneItem:oneImageStruct = oneImageStruct(savePHAsset: asset as PHAsset, flag: self.flagOff)
self.oneImgeArray.append(saveOneItem)
}
//メインスレッドからアクセス
DispatchQueue.main.async {
self.photoListCollectionView.reloadData()
}
}
- cellForItemAt
構造体の「UIImage」を「PHAsset」に変更しているのでその対応です。
「PhotoCollectionViewCell」の「setConfigure」メソッドに引き渡します。
func collectionView(_ collectionView: UICollectionView, cellForItemAt indexPath: IndexPath) -> UICollectionViewCell
{
let cell : PhotoCollectionViewCell = collectionView.dequeueReusableCell(withReuseIdentifier: “cell”, for: indexPath) as! PhotoCollectionViewCell
//二重に表示されるのを防ぐ
for subview in cell.contentView.subviews{
subview.removeFromSuperview()
}
let index = indexPath.row
let checkFlag:Bool = self.oneImgeArray[index].flag
let workPHAsset:PHAsset = self.oneImgeArray[index].savePHAsset
if checkFlag
{
cell.setConfigure(assets: workPHAsset,flag:self.flagOn)
} else {
cell.setConfigure(assets: workPHAsset,flag:self.flagOff)
}
return cell
}
PhotoCollectionViewCell
セルのクラスの解説です。
- 準備
「Photos」フレームワークをインポートします。
import UIKit
import Photos
- 「PHAsset」から画像データを取得して「UIImageView」に設定
func setConfigure(assets: PHAsset,flag:Bool) {
let targetSize = CGSize(width: self.bounds.width, height: self.bounds.height)
let manager: PHImageManager = PHImageManager()
manager.requestImage(for: assets,targetSize: targetSize,contentMode: .aspectFill,options: nil) { (image, info) -> Void in
if let degraded = info?[PHImageResultIsDegradedKey] as? NSNumber, !degraded.boolValue {
if image != nil{
//画像正方形
let saveImage:UIImage = image?.pingMakesquare() ?? UIImage()
self.thumbnailImageView.image = saveImage
}
} else {
}
}
if flag {
self.checkBlueView.isHidden = false
self.checkWhiteView.isHidden = true
} else {
self.checkBlueView.isHidden = true
self.checkWhiteView.isHidden = false
}
}
「image?.pingMakesquare() ?? UIImage()」は下記のメソッドを用意しました。(前回も使用しています)
「PHImageManager」を利用して画像データを取得します。
extension UIImage {
func pingMakesquare()-> UIImage!{
let cgImage = self.cgImage
let workWidth = (cgImage?.width)!
let workHeight = (cgImage?.height)!
let resizeSize = min(workHeight,workWidth)
let makeCGImage = self.cgImage?.cropping(to: CGRect(x: (workWidth – resizeSize) / 2, y: (workHeight – resizeSize) / 2, width: resizeSize, height: resizeSize))
let makeImage = UIImage(cgImage: makeCGImage!)
return makeImage
}
}
まとめ
「カメラロール」から画像データを取得するとアプリぽくなりますね。
基盤となるロジックがわかっていれば、色々と応用が効くようになります。
「この画像データを「カテゴリ」「日付」等毎にまとめて表示したい」といった要望もよく聞きます。
ヘッダーを追加して、「カテゴリ」「日付」等毎にまとめて表示みたいな対応になりますね。
それではまた!


