


こんにちは、Popoです!
「UITableView」の次は、「UICollectionView」ですね!
こんな方へのお勧めの記事です。
- 「UICollectionView」を利用した画面を作成してみたい
- 「UICollectionView」の基本をマスタしたい
実装方法は、「UITableView」と似ていますので取りかかりやすいと思います。

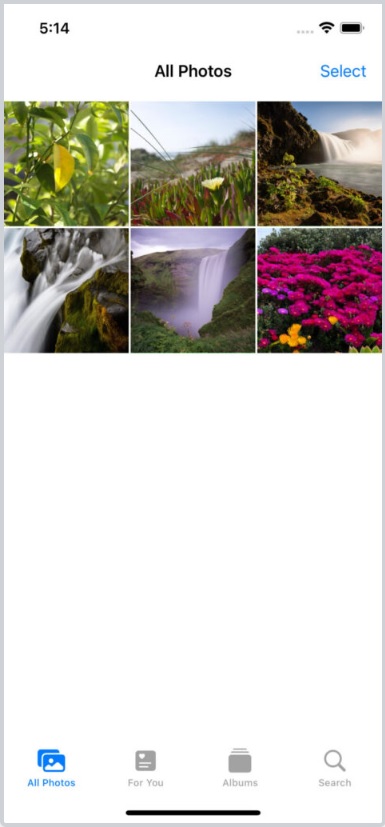
「UICollectionView」は複数のパネルを一覧として表示する画面などでよく使用されますね。
iPhoneの写真画面でみかけるUIですね。
「UITableView」とは違った表現のUIですね。
アプリの動作環境
今回のアプリ開発環境は下記になります。
| 項目 | バージョン |
| Xcode | Version 14.3.1 (14E300c) |
| Swift | Swift version 5.8.1 |
| MacOS | macOS Ventura バージョン13.4(22F66) |
ソースコード全体

初めにソースコード全体を見てみましょう!その前に前提条件をお話します。
開発での前提条件
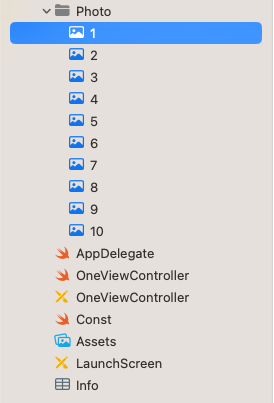
- 画像データは予めproject内に格納しておきます。データ名は1〜10の数字を設定しておきます。
- 画面のサイズは「public」定義しておきます。
public let SCREEN_WIDTH = UIScreen.main.bounds.width
public let SCREEN_HEIGHT = UIScreen.main.bounds.height
UIViewController (OneViewController)
メインのUIViewControllerです。
主な機能
- ナビゲーションバーカスタマイズ
- UICollectionViewDelegateFlowLayoutの設定
- UICollectionViewの生成
- 表示用配列作成
import UIKit

class OneViewController: UIViewController {

    //表示用配列
    fileprivate var oneImgeArray:[UIImage] = []
    //UICollectionView
    fileprivate var photoListCollectionView: UICollectionView!

    override func viewDidLoad() {
        super.viewDidLoad()

        self.view.backgroundColor = .black

        self.navigationItem.title = "Popo"

        let attrs: [NSAttributedString.Key: Any] = [
            .foregroundColor: UIColor.white,
            .font: UIFont(name: "HiraginoSans-W6",size:17)!,
            .baselineOffset:1
        ]

        // iOS15以降の場合
        let appearance = UINavigationBarAppearance()
        appearance.backgroundColor = .brown
        appearance.titleTextAttributes = attrs
        self.navigationController?.navigationBar.scrollEdgeAppearance = appearance
        // CollectionViewのレイアウトを生成.
        let layout = UICollectionViewFlowLayout()
        // Cell間の最小サイズ
        layout.minimumInteritemSpacing = 1
        // 行間の最小サイズ
        layout.minimumLineSpacing = 1
        // セクションのヘッダーサイズ
        layout.headerReferenceSize = CGSize(width:0,height:0)
        // Cell一つ一つの大きさ.
        let photoSize:CGFloat = (SCREEN_WIDTH - 5)/4
        layout.itemSize = CGSize(width:photoSize, height:photoSize)
        // Cellのマージン.
        layout.sectionInset = UIEdgeInsets(top: 1, left: 1, bottom: 1, right: 1)

        layout.itemSize = CGSize(width: photoSize, height: photoSize)

        // CollectionViewを生成.
        self.photoListCollectionView = UICollectionView(frame: CGRect(x: 0, y: 0, width: SCREEN_WIDTH, height: SCREEN_HEIGHT), collectionViewLayout: layout)

        self.photoListCollectionView.register(UICollectionViewCell.self, forCellWithReuseIdentifier: "cell")

        self.photoListCollectionView.delegate = self
        self.photoListCollectionView.dataSource = self
        self.view.addSubview(photoListCollectionView)
        //表示用配列生成
        for index in 0 ..< 10
        {
            let saveIndex:Int = index + 1
            let iconName:String = String(saveIndex) + ".jpg"
            let saveImage:UIImage = UIImage(named: iconName) ?? UIImage()
            self.oneImgeArray.append(saveImage)
        }
    }

}
//MARK: UICollectionView
extension OneViewController: UICollectionViewDelegate, UICollectionViewDataSource, UICollectionViewDelegateFlowLayout
{
    func collectionView(_ collectionView: UICollectionView, numberOfItemsInSection section: Int) -> Int
    {
        return 10
    }

    func collectionView(_ collectionView: UICollectionView, cellForItemAt indexPath: IndexPath) -> UICollectionViewCell
    {
        let cell : UICollectionViewCell = collectionView.dequeueReusableCell(withReuseIdentifier: "cell", for: indexPath)
        //二重に表示されるのを防ぐ
        for subview in cell.contentView.subviews{
            subview.removeFromSuperview()
        }

        let iconView = UIImageView(image:self.oneImgeArray[indexPath.row])
        iconView.frame = CGRect(x: 0, y: 0, width: cell.frame.width, height: cell.frame.height)
        iconView.backgroundColor = UIColor.clear
        iconView.contentMode = UIView.ContentMode.scaleAspectFit

        cell.contentView.addSubview(iconView)

        return cell
    }
    //MARK:UICollectionViewDelegate
    //選択された時に呼ばれる.
    func collectionView(_ collectionView: UICollectionView, didSelectItemAt indexPath: IndexPath)
    {
    }
}
アプリの画面表示
出来上がったアプリ画面はこうなります。
UIViewControllerの各ロジック解説

UITableViewに似たdelegateメソッドです。
UITableViewをマスタしている方であれば、頭に入りやすいと思います。
viewDidLoad
- ナビゲーションバーカスタマイズ
ナビゲーションバーのカスタマイズは今まで通りです!
self.view.backgroundColor = .black
self.navigationItem.title = “Popo”
let attrs: [NSAttributedString.Key: Any] = [
.foregroundColor: UIColor.white,
.font: UIFont(name: “HiraginoSans-W6”,size:17)!,
.baselineOffset:1
]
// iOS15以降の場合
let appearance = UINavigationBarAppearance()
appearance.backgroundColor = .brown
appearance.titleTextAttributes = attrs
self.navigationController?.navigationBar.scrollEdgeAppearance = appearance
- UICollectionViewFlowLayout設定
UICollectionViewFlowLayoutを生成して、各プロパティに値を設定します。
// CollectionViewのレイアウトを生成.
let layout = UICollectionViewFlowLayout()
// Cell間の最小サイズ
layout.minimumInteritemSpacing = 1
// 行間の最小サイズ
layout.minimumLineSpacing = 1
// セクションのヘッダーサイズ
layout.headerReferenceSize = CGSize(width:0,height:0)
// Cell一つ一つの大きさ.
let photoSize:CGFloat = (SCREEN_WIDTH – 5)/4
layout.itemSize = CGSize(width:photoSize, height:photoSize)
// Cellのマージン.
layout.sectionInset = UIEdgeInsets(top: 1, left: 1, bottom: 1, right: 1)
layout.itemSize = CGSize(width: photoSize, height: photoSize)
詳細なプロパティについては、一度Appleのマニュアルを参照してみてください。

セルのサイズ定義箇所ですが、
// Cell一つ一つの大きさ.
let photoSize:CGFloat = (SCREEN_WIDTH – 5)/4
layout.itemSize = CGSize(width:photoSize, height:photoSize)
- 「UICollectionView」生成
UITableViewと同じですね😊
// CollectionViewを生成.
self.photoListCollectionView = UICollectionView(frame: CGRect(x: 0, y: 0, width: SCREEN_WIDTH, height: SCREEN_HEIGHT), collectionViewLayout: layout)
self.photoListCollectionView.register(UICollectionViewCell.self, forCellWithReuseIdentifier: “cell”)
self.photoListCollectionView.delegate = self
self.photoListCollectionView.dataSource = self
self.view.addSubview(photoListCollectionView)
「UICollectionView」の詳細については、こちらもAppleマニュアルを参照してみてください。
UICollectionViewDataSource、UICollectionViewDelegateメソッド
今回は基本的なメソッドまでとしました。
//MARK: UICollectionView
extension OneViewController: UICollectionViewDelegate, UICollectionViewDataSource, UICollectionViewDelegateFlowLayout
{
func collectionView(_ collectionView: UICollectionView, numberOfItemsInSection section: Int) -> Int
{
return 10
}
func collectionView(_ collectionView: UICollectionView, cellForItemAt indexPath: IndexPath) -> UICollectionViewCell
{
let cell : UICollectionViewCell = collectionView.dequeueReusableCell(withReuseIdentifier: “cell”, for: indexPath)
//二重に表示されるのを防ぐ
for subview in cell.contentView.subviews{
subview.removeFromSuperview()
}
/*
let iconView = UIImageView(image:self.oneImgeArray[indexPath.row])
iconView.frame = CGRect(x: 0, y: 0, width: cell.frame.width, height: cell.frame.height)
iconView.backgroundColor = UIColor.clear
iconView.contentMode = UIView.ContentMode.scaleAspectFit
cell.contentView.addSubview(iconView)
return cell
}
//MARK:UICollectionViewDelegate
//選択された時に呼ばれる.
func collectionView(_ collectionView: UICollectionView, didSelectItemAt indexPath: IndexPath)
{
}
}
その他詳細なメソッドについては、一度Appleのマニュアルを参照して欲しいですね。
今回使用するメソッドは下記3つにしました。
- 「func collectionView(UICollectionView, numberOfItemsInSection: Int) -> Int」
セルの数を設定します。 - 「func collectionView(UICollectionView, cellForItemAt: IndexPath) -> UICollectionViewCell」
セルに表示するUIを生成しセルに張り付けて返却します。 - 「func collectionView(UICollectionView, didSelectItemAt: IndexPath)」
セル選択時にCallされるメソッドです。
let iconView = UIImageView(image:self.oneImgeArray[indexPath.row])
まとめ

UITableViewをマスタしている方であれば、直ぐに使いこなせるのではないでしょうか。
iPhoneの写真の画像データを一覧表示したり、サーバに格納されている画像データを受信して表示するといった場合によく使用されるViewになります。
マスタして使えるようにしておきましょう!
UICollectionViewも応用編として色々カスタマイズしていきたいと思います。

それではまた!


