


こんにちは!Popoです。
こんな方へのお勧めの記事です。
- UITableViewの応用機能をマスタしたい
- UITableViewでセルの並び替え機能を実装したい
前回の記事の応用編ということで、セルの並べ替えをできる画面を実装してみたいと思います。
popo


【swift アプリ開発】UITableViewをロジックで実装(「Interface Builder」、「Storyboard」を使わない) |…
こんにちは!Popoです。 こんな方へのお勧めの記事です。 ロジックでUITableViewを実装してみたい。 表題に「「Interface Builder」、「Storyboard」を使わない」とありま…
UIも面白くて、お客さんからも要望のあるUIです。マスタしておけば、便利な機能だと思います。
目次
アプリの動作環境

今回の動作環境は下記になります!
| 項目 | バージョン |
| Xcode | Version 14.3.1 (14E300c) |
| Swift | Swift version 5.8.1 |
| MacOS | macOS Ventura バージョン13.4(22F66) |
アプリ全体のソースコード
「【swift アプリ開発】UITableViewをロジックで実装(「Interface Builder」、「Storyboard」を使わない)」でのロジックから追加した部分を黄色にしています。
import UIKit
class OneViewController: UIViewController {
let SCREEN_WIDTH = UIScreen.main.bounds.width
let SCREEN_HEIGHT = UIScreen.main.bounds.height
var navigationBarHeight: CGFloat = 44
var statusHieght:CGFloat = 0
var cellCounter:Int = 0
//UITableView
fileprivate var oneTableView: UITableView!
fileprivate var editFlag: Bool = false
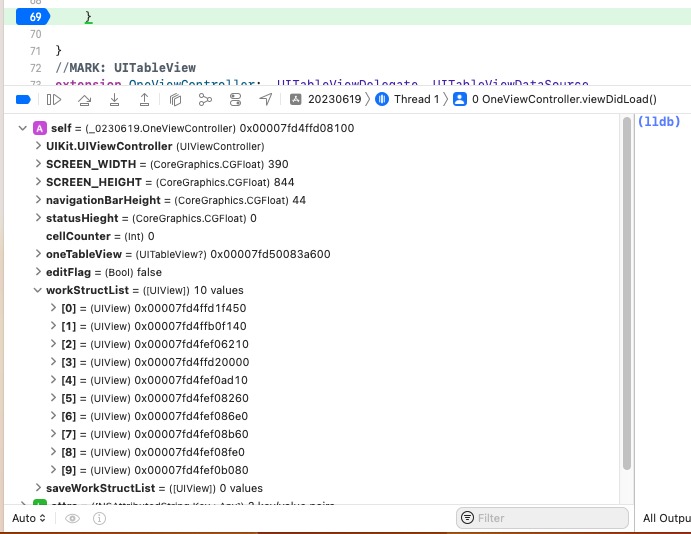
fileprivate var workStructList:[UIView] = []
//退避エリア
fileprivate var saveWorkStructList:[UIView] = []
override func viewDidLoad() {
super.viewDidLoad()
self.navigationItem.title = "Popo"
let attrs: [NSAttributedString.Key: Any] = [
.foregroundColor: UIColor.white,
.font: UIFont(name: "HiraginoSans-W6",size:17)!,
.baselineOffset:1
]
// iOS15以降の場合
let appearance = UINavigationBarAppearance()
appearance.backgroundColor = .brown
appearance.titleTextAttributes = attrs
self.navigationController?.navigationBar.scrollEdgeAppearance = appearance
//UITableView
self.oneTableView = UITableView()
self.oneTableView.frame = CGRect(x: 0, y: 0, width: SCREEN_WIDTH, height: SCREEN_HEIGHT)
self.oneTableView.allowsSelectionDuringEditing = true
// DataSourceの設定をする.
self.oneTableView.dataSource = self
// Delegateを設定する.
self.oneTableView.delegate = self
//self.oneTableView.separatorInset = UIEdgeInsets.zero // 区切り線を左まで伸ばす
self.oneTableView.backgroundColor = RGBAlpa(238, 245, 243, 1)
self.oneTableView.separatorStyle = .singleLine
self.oneTableView.separatorColor = .gray
self.view.addSubview(self.oneTableView)
for index in 0 ..< 10
{
let cellView:UIView = self.makeTableView(cellHeight: 50, cellIndex: index)
self.workStructList.append(cellView)
}
}
}
//MARK: UITableView
extension OneViewController: UITableViewDelegate, UITableViewDataSource
{
/*
セクション数を返すデータソースメソッド.
(実装必須)
*/
func numberOfSections(in tableView: UITableView) -> Int
{
return 1
}
/*
Cellの総数を返すデータソースメソッド.
(実装必須)
*/
func tableView(_ tableView: UITableView, numberOfRowsInSection section: Int) -> Int
{
return self.workStructList.count + 1
}
/*
Cellの高さを返すデータソースメソッド.
(実装必須)
*/
func tableView(_ tableView: UITableView, heightForRowAt indexPath: IndexPath) -> CGFloat
{
let saveRow:Int = indexPath.row
if saveRow <= 9
{
return 50
} else {
return 100
}
}
func tableView(_ tableView: UITableView, cellForRowAt indexPath: IndexPath) -> UITableViewCell
{
let workCellName : String! = NSString(format:"MyCell%d_%d",self.cellCounter,self.cellCounter) as String
self.cellCounter = self.cellCounter + 1
self.oneTableView.register(UITableViewCell.self, forCellReuseIdentifier: workCellName)
let cell = self.oneTableView.dequeueReusableCell(withIdentifier: workCellName, for: indexPath)
//これでセルをタップ時、色は変化しなくなる
cell.selectionStyle = UITableViewCell.SelectionStyle.none
//二重に表示されるのを防ぐ
for subview in cell.contentView.subviews{
subview.removeFromSuperview()
}
let saveRow:Int = indexPath.row
if self.workStructList.count > saveRow
{
let cellView:UIView = self.workStructList[saveRow]
cell.contentView.addSubview(cellView)
} else {
let cellFooterView:UIView = self.makeFooterView(cellHeight: cell.frame.height)
cell.contentView.addSubview(cellFooterView)
}
return cell
}
/*
Cellが選択された際に呼び出されるデリゲートメソッド.
*/
func tableView(_ tableView: UITableView, didSelectRowAt indexPath: IndexPath)
{
self.oneTableView?.deselectRow(at: indexPath, animated: true)
}
//編集モード時のセルのスタイル
func tableView(_ tableView: UITableView, editingStyleForRowAt indexPath: IndexPath) -> UITableViewCell.EditingStyle {
return .none
}
func tableView(_ tableView: UITableView, shouldIndentWhileEditingRowAt indexPath: IndexPath) -> Bool {
return false
}
//並び替え制御
func tableView(_ tableView: UITableView, canMoveRowAt indexPath: IndexPath) -> Bool {
return true
}
//並び替え制御
func tableView(_ tableView: UITableView, moveRowAt sourceIndexPath: IndexPath, to destinationIndexPath: IndexPath) {
if (destinationIndexPath.row < self.workStructList.count) && (sourceIndexPath.row < self.workStructList.count)
{
let sourceCellItem = self.workStructList[sourceIndexPath.row]
self.workStructList.remove(at: sourceIndexPath.row)
self.workStructList.insert(sourceCellItem, at: destinationIndexPath.row)
} else {
self.oneTableView.reloadData()
}
}
}
//MARK:UITabeView View生成
extension OneViewController
{
//cell View 生成
fileprivate func makeTableView(cellHeight:CGFloat,cellIndex:Int) -> UIView
{
//header用View
let headerView:UIView = UIView()
headerView.frame = CGRect(x: 0, y: 0, width: SCREEN_WIDTH, height: cellHeight)
headerView.backgroundColor = RGBAlpa(238, 245, 243, 1)
//detailLabel
let detailLabel = UILabel()
detailLabel.frame = CGRect(x:20, y: 10 , width: headerView.frame.width - 40, height: headerView.frame.height - 20)
detailLabel.font = UIFont(name: "HiraginoSans-W6",size:15)
detailLabel.text = "Heelo World!"
detailLabel.textColor = RGBAlpa(0,51,40, 1)
detailLabel.textAlignment = .center
detailLabel.adjustsFontSizeToFitWidth = true
detailLabel.minimumScaleFactor = 0.3
switch cellIndex {
case 0:
detailLabel.backgroundColor = .red
case 1:
detailLabel.backgroundColor = .blue
case 2:
detailLabel.backgroundColor = .yellow
case 3:
detailLabel.backgroundColor = .cyan
case 4:
detailLabel.backgroundColor = .gray
case 5:
detailLabel.backgroundColor = .red
case 6:
detailLabel.backgroundColor = .blue
case 7:
detailLabel.backgroundColor = .yellow
case 8:
detailLabel.backgroundColor = .cyan
case 9:
detailLabel.backgroundColor = .gray
default:
detailLabel.backgroundColor = .purple
}
headerView.addSubview(detailLabel)
return headerView
}
//footer View 生成
fileprivate func makeFooterView(cellHeight:CGFloat) -> UIView
{
let footerView = UIView()
footerView.frame = CGRect(x: 0, y: 0, width: SCREEN_WIDTH, height: cellHeight)
footerView.backgroundColor = UIColor.clear
let buttonWidth:CGFloat = (SCREEN_WIDTH)/2 - 30
//並び替えボタン----------------------------------------------
let sortingButton = UIButton()
sortingButton.frame = CGRect(x: (SCREEN_WIDTH - (SCREEN_WIDTH/1.5))/2, y: (cellHeight - 50)/2, width: (SCREEN_WIDTH)/1.5, height: 50)
sortingButton.setTitle("並べ替え", for: .normal)
sortingButton.titleLabel?.font = UIFont(name: "HiraginoSans-W6", size: 17)!
sortingButton.setTitleColor(UIColor.white, for: .normal)
sortingButton.addTarget(self, action: #selector(OneViewController.sortingClick(_:)), for: .touchUpInside)
sortingButton.backgroundColor = RGBAlpa(0,109,86,1)
sortingButton.layer.cornerRadius = 25
if (!self.editFlag)
{
footerView.addSubview(sortingButton)
}
//cancelボタン-----------------------------------------------------
let sortingCancelButton = UIButton()
sortingCancelButton.frame = CGRect(x: 10, y: (cellHeight - 50)/2, width: buttonWidth, height: 50)
sortingCancelButton.setTitle("キャンセル", for: .normal)
sortingCancelButton.titleLabel?.font = UIFont(name: "HiraginoSans-W6", size: 17)!
sortingCancelButton.setTitleColor(UIColor.white, for: .normal)
sortingCancelButton.addTarget(self, action: #selector(OneViewController.sortingCancelClick(_:)), for: .touchUpInside)
sortingCancelButton.backgroundColor = RGBAlpa(0,109,86,1)
sortingCancelButton.layer.cornerRadius = 25
if self.editFlag
{
footerView.addSubview(sortingCancelButton)
}
//saveボタン---------------------------------------------------------
let saveButton = UIButton()
//sortingButton.frame = CGRect(x: (SCREEN_WIDTH - (SCREEN_WIDTH/1.5))/2, y: (self.CELL_HEGHT - 50)/2, width: (SCREEN_WIDTH)/1.5, height: 50)
saveButton.frame = CGRect(x: 10 + buttonWidth + 20, y: (cellHeight - 50)/2, width: buttonWidth, height: 50)
saveButton.setTitle("保存", for: .normal)
//sortingButton.setTitle("Change Order", for: .normal)
saveButton.titleLabel?.font = UIFont(name: "HiraginoSans-W6", size: 17)!
saveButton.setTitleColor(UIColor.white, for: .normal)
saveButton.addTarget(self, action: #selector(OneViewController.sortingSaveClick(_:)), for: .touchUpInside)
//sortingButton.backgroundColor = RGBAlpa(0,164,175,1)
saveButton.backgroundColor = RGBAlpa(0,109,86,1)
saveButton.layer.cornerRadius = 25
if self.editFlag
{
footerView.addSubview(saveButton)
}
return footerView
}
}
//MARK:ボタンタップ
extension OneViewController
{
//並べ替えボタン
@objc func sortingClick(_ sender: UIButton)
{
//現状の構造体を退避する
self.saveWorkStructList = self.workStructList
self.editFlag = true
self.oneTableView.isEditing = self.editFlag
self.oneTableView.reloadData()
}
//キャンセルボタン
@objc func sortingCancelClick(_ sender: UIButton)
{
self.editFlag = false
self.oneTableView.isEditing = self.editFlag
//キャンセルの場合は戻す
self.workStructList = self.saveWorkStructList
self.oneTableView.reloadData()
//戻したらクリア
self.saveWorkStructList = []
}
//saveボタン
@objc func sortingSaveClick(_ sender: UIButton)
{
//saveしたらクリア
self.saveWorkStructList = []
self.editFlag = false
self.oneTableView.isEditing = self.editFlag
self.oneTableView.reloadData()
}
}
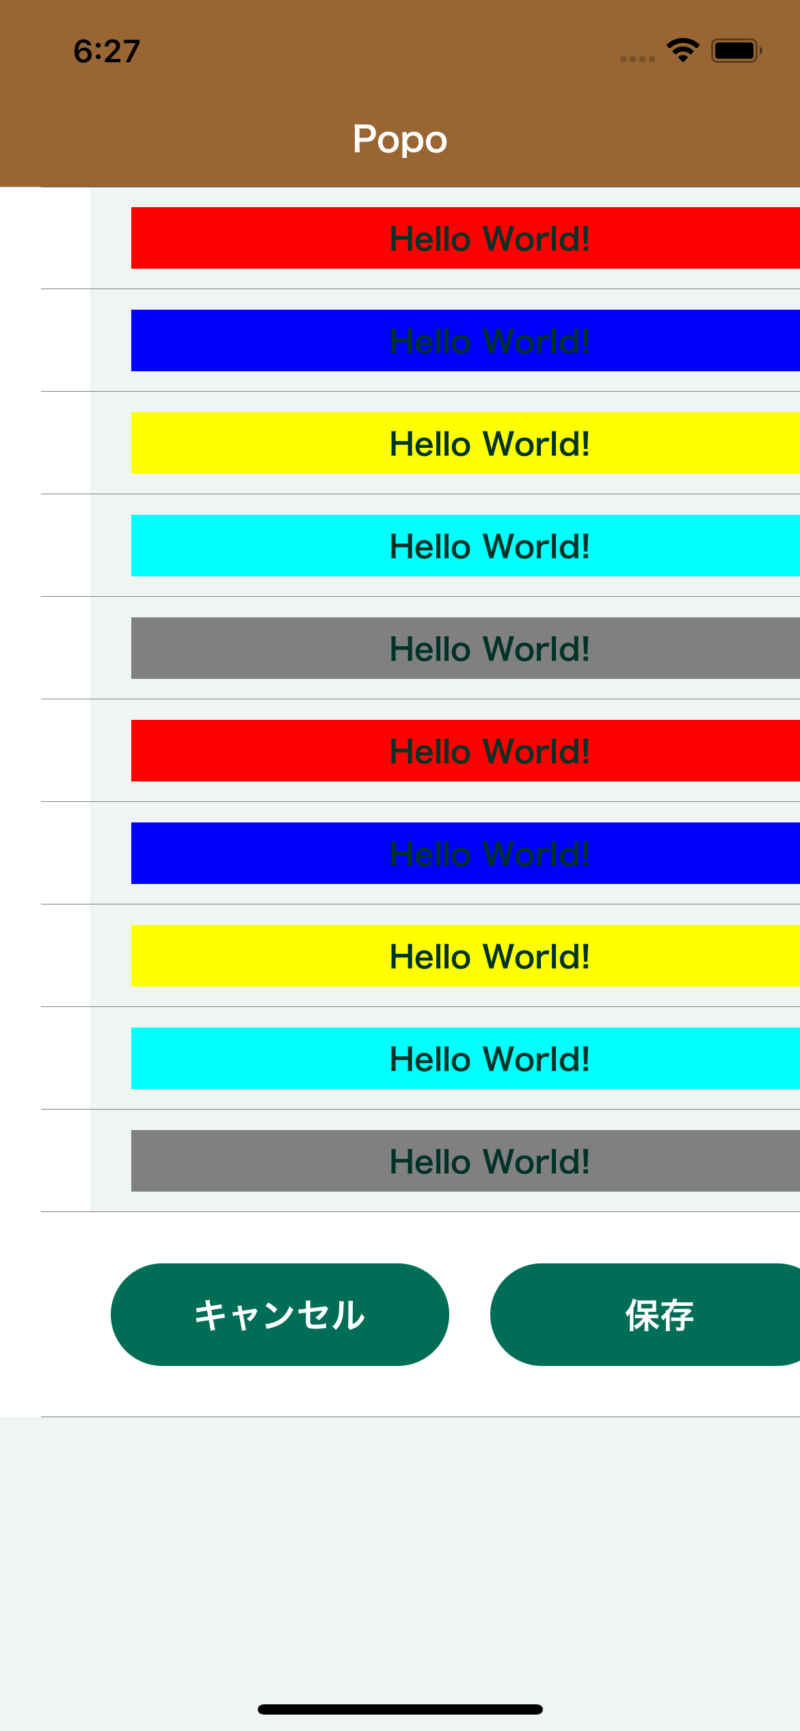
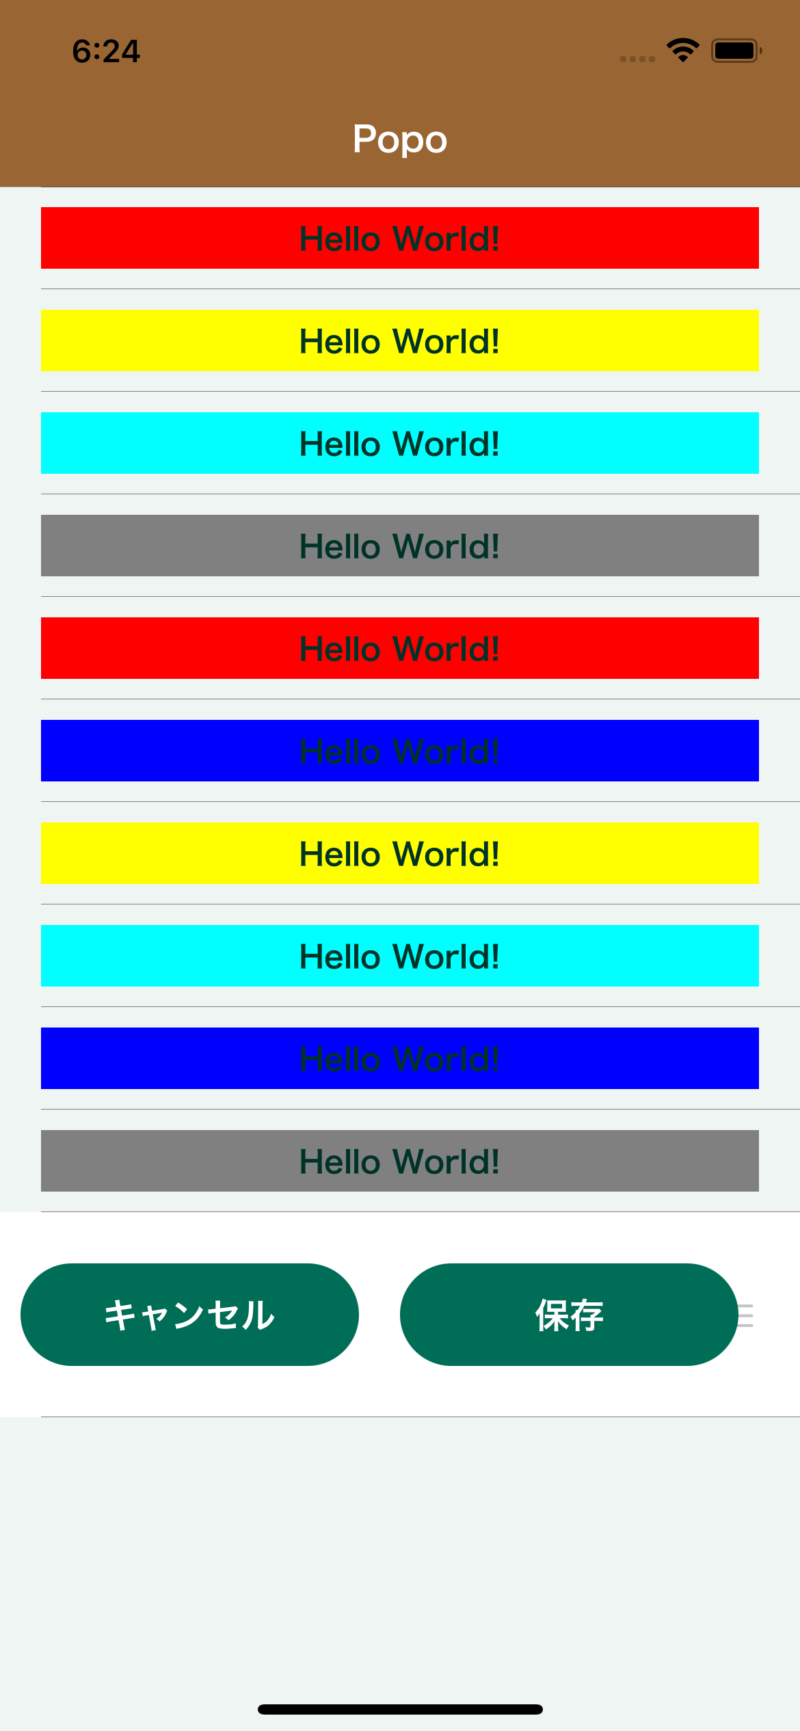
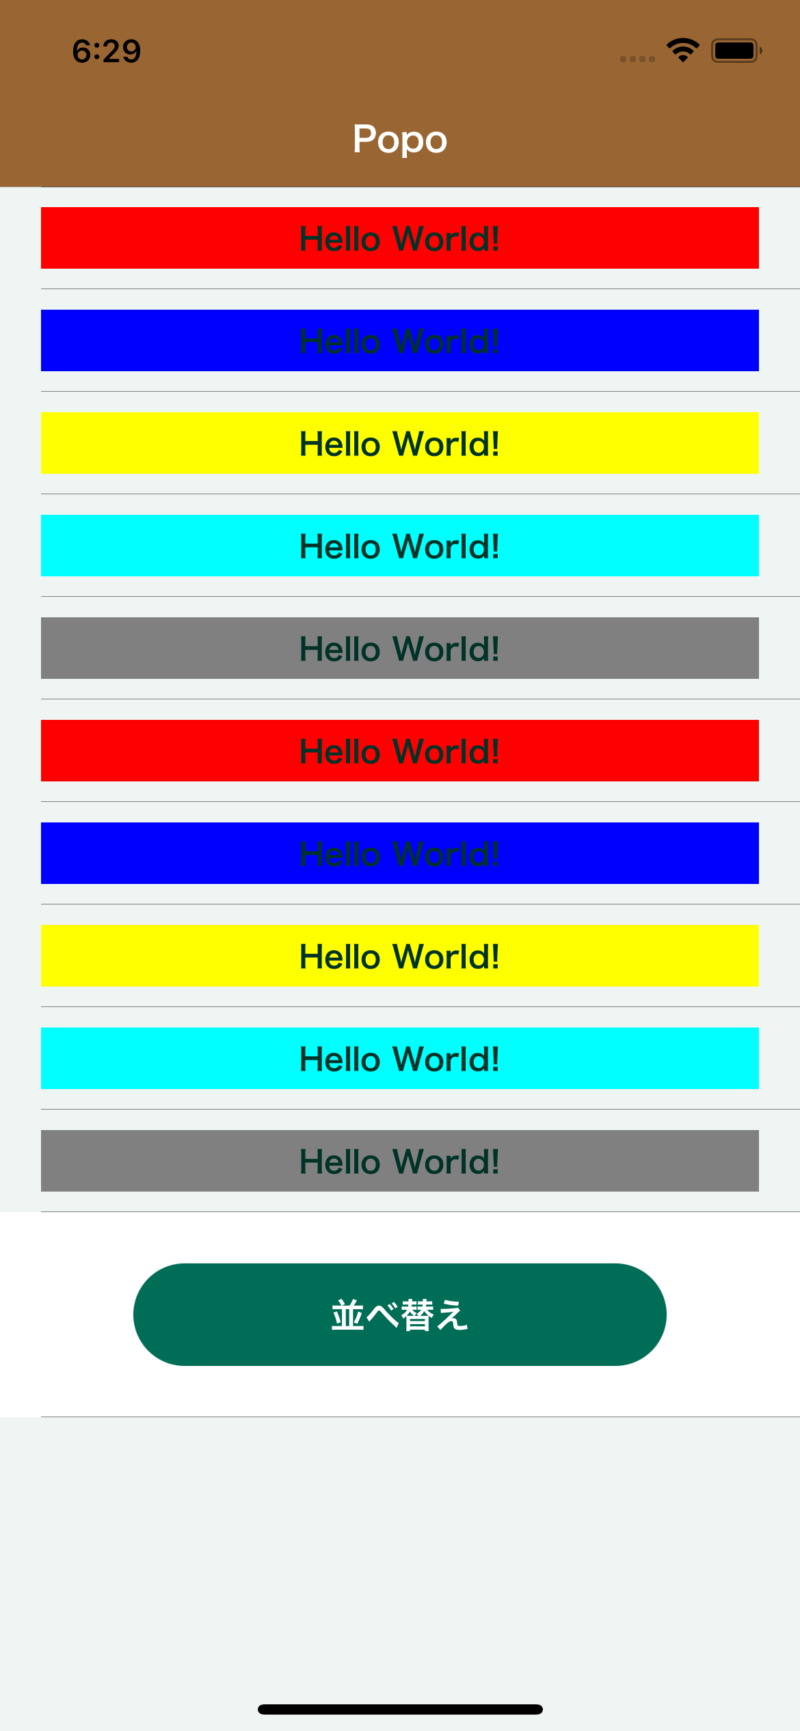
こんな感じでセルの並べ替えが可能となります。
各ロジックの解説

前回記事からの追加部分を解説します。
配列の定義
   fileprivate var editFlag: Bool = false

   fileprivate var workStructList:[UIView] = []
   //退避エリア
fileprivate var saveWorkStructList:[UIView] = []- editFlagは、セルが更新状態か非更新状態かを制御するフラグになります。
- 「workStructList」配列はセルに貼り付けるViewを格納します。
- 「saveWorkStructList」配列は「キャンセル」時、UIViewの並び順を退避するための配列です。
viewDidLoadでの追加処理
追加ロジックを黄色の文字色にしています。
    override func viewDidLoad() {
        super.viewDidLoad()

     〜中省略〜

        //UITableView
        self.oneTableView = UITableView()
        self.oneTableView.frame = CGRect(x: 0, y: 0, width: SCREEN_WIDTH, height: SCREEN_HEIGHT)

        self.oneTableView.allowsSelectionDuringEditing = true
        // DataSourceの設定をする.
        self.oneTableView.dataSource = self
        // Delegateを設定する.
        self.oneTableView.delegate = self
        //self.oneTableView.separatorInset = UIEdgeInsets.zero  // 区切り線を左まで伸ばす

        self.oneTableView.backgroundColor = RGBAlpa(238, 245, 243, 1)

        self.oneTableView.separatorStyle = .singleLine
        self.oneTableView.separatorColor = .gray

        self.view.addSubview(self.oneTableView)

        for index in 0 ..< 10
        {
            let cellView:UIView = self.makeTableView(cellHeight: 50, cellIndex: index)
            self.workStructList.append(cellView)
        }

}- 「allowsSelectionDuringEditing」はUITableViewが編集モード時に、セルを選択可能にするしないのプロパティです。(下記を参考)
Apple Developer Documentation

allowsSelectionDuringEditing | Apple Developer Documentation
A Boolean value that determines whether users can select cells while the table view is in editing mode.
- 「for」文は、「makeTableView」メソッドで生成したUIViewを配列に格納しています。
デバックしたときの配列はこんな感じです。
UITableViewDataSourceメソッド修正
- 「numberOfRowsInSection」でセルの総数を変更します。
- 「heightForRowAt」で最終行のセルだけ高さを変更します。
これは、セル最終行にボタンを表示するためです。
     /*
     Cellの総数を返すデータソースメソッド.
     (実装必須)
     */
    func tableView(_ tableView: UITableView, numberOfRowsInSection section: Int) -> Int
    {
        return self.workStructList.count + 1
    }
    /*
     Cellの高さを返すデータソースメソッド.
     (実装必須)
     */
    func tableView(_ tableView: UITableView, heightForRowAt indexPath: IndexPath) -> CGFloat
    {
        let saveRow:Int = indexPath.row

        if saveRow <= 9
        {
            return 50
        } else {
            return 100
        }
    }
UITableViewDataSourceメソッド追加
ここからが並び替えらしい表現になってきます。
     //編集モード時のセルのスタイル
    func tableView(_ tableView: UITableView, editingStyleForRowAt indexPath: IndexPath) -> UITableViewCell.EditingStyle {

        return .none
    }

    func tableView(_ tableView: UITableView, shouldIndentWhileEditingRowAt indexPath: IndexPath) -> Bool {
        return false
    }
    //並び替え制御
    func tableView(_ tableView: UITableView, canMoveRowAt indexPath: IndexPath) -> Bool {
        return true
    }
    //並び替え制御
    func tableView(_ tableView: UITableView, moveRowAt sourceIndexPath: IndexPath, to destinationIndexPath: IndexPath) {

        if (destinationIndexPath.row  <  self.workStructList.count) && (sourceIndexPath.row  <  self.workStructList.count)
        {
            let sourceCellItem = self.workStructList[sourceIndexPath.row]

            self.workStructList.remove(at: sourceIndexPath.row)
            self.workStructList.insert(sourceCellItem, at: destinationIndexPath.row)

        } else {
            self.oneTableView.reloadData()
        }

}- 「editingStyleForRowAt」は、UITableViewを編集モードにすると、右スワイプで「削除」ボタンが表示されるようになります。この「削除」ボタンを表示しないように「none」の指定にしています。
- 「shouldIndentWhileEditingRowAt」は、「削除」ボタン非表示の画面空白をなくすための指定になります。
指定なし
指定あり
- 「canMoveRowAt」、「moveRowAt」はセル移動を許可します。
「moveRowAt」では、セル移動時のセル制御を行なっています。
CellのView生成とセル下部のボタン実装
「並び替え」「保存」「キャンセル」ボタンを生成しています。
編集モードフラグ(editFlag)編集中か非編集中かで、ボタン表示を変えます。
- true→編集中
- false→非編集中
    //footer View 生成
    fileprivate func makeFooterView(cellHeight:CGFloat) -> UIView
    {
        let footerView = UIView()
        footerView.frame = CGRect(x: 0, y: 0, width: SCREEN_WIDTH, height: cellHeight)
        footerView.backgroundColor = UIColor.clear

        let buttonWidth:CGFloat = (SCREEN_WIDTH)/2 - 30
        //並び替えボタン----------------------------------------------
        let sortingButton = UIButton()
        sortingButton.frame = CGRect(x: (SCREEN_WIDTH - (SCREEN_WIDTH/1.5))/2, y: (cellHeight - 50)/2, width: (SCREEN_WIDTH)/1.5, height: 50)

        sortingButton.setTitle("並べ替え", for: .normal)

        sortingButton.titleLabel?.font = UIFont(name: "HiraginoSans-W6", size: 17)!
        sortingButton.setTitleColor(UIColor.white, for: .normal)
        sortingButton.addTarget(self, action: #selector(OneViewController.sortingClick(_:)), for: .touchUpInside)
        sortingButton.backgroundColor = RGBAlpa(0,109,86,1)
        sortingButton.layer.cornerRadius = 25
        if (!self.editFlag)
        {
            footerView.addSubview(sortingButton)
        }
        //cancelボタン-----------------------------------------------------
        let sortingCancelButton = UIButton()
        sortingCancelButton.frame = CGRect(x: 10, y: (cellHeight - 50)/2, width: buttonWidth, height: 50)

        sortingCancelButton.setTitle("キャンセル", for: .normal)

        sortingCancelButton.titleLabel?.font = UIFont(name: "HiraginoSans-W6", size: 17)!
        sortingCancelButton.setTitleColor(UIColor.white, for: .normal)
        sortingCancelButton.addTarget(self, action: #selector(OneViewController.sortingCancelClick(_:)), for: .touchUpInside)
        sortingCancelButton.backgroundColor = RGBAlpa(0,109,86,1)
        sortingCancelButton.layer.cornerRadius = 25
        if self.editFlag
        {
            footerView.addSubview(sortingCancelButton)
        }
        //saveボタン---------------------------------------------------------
        let saveButton = UIButton()
        //sortingButton.frame = CGRect(x: (SCREEN_WIDTH - (SCREEN_WIDTH/1.5))/2, y: (self.CELL_HEGHT - 50)/2, width: (SCREEN_WIDTH)/1.5, height: 50)

        saveButton.frame = CGRect(x: 10 + buttonWidth + 20, y: (cellHeight - 50)/2, width: buttonWidth, height: 50)
        saveButton.setTitle("保存", for: .normal)

        //sortingButton.setTitle("Change Order", for: .normal)
        saveButton.titleLabel?.font = UIFont(name: "HiraginoSans-W6", size: 17)!
        saveButton.setTitleColor(UIColor.white, for: .normal)
        saveButton.addTarget(self, action: #selector(OneViewController.sortingSaveClick(_:)), for: .touchUpInside)
        //sortingButton.backgroundColor = RGBAlpa(0,164,175,1)
        saveButton.backgroundColor = RGBAlpa(0,109,86,1)
        saveButton.layer.cornerRadius = 25
        if self.editFlag
        {
            footerView.addSubview(saveButton)
        }

        return footerView
    }
各ボタンタップ時の実装
「並べ替え」「保存」「キャンセル」ボタンのタップイベントを実装します。
//MARK:ボタンタップ
extension OneViewController
{
    //並べ替えボタン
    @objc func sortingClick(_ sender: UIButton)
    {

        //現状の構造体を退避する
        self.saveWorkStructList = self.workStructList

        self.editFlag = true
        self.oneTableView.isEditing = self.editFlag

        self.oneTableView.reloadData()
    }
    //キャンセルボタン
    @objc func sortingCancelClick(_ sender: UIButton)
    {
        self.editFlag = false
        self.oneTableView.isEditing = self.editFlag
        //キャンセルの場合は戻す
        self.workStructList = self.saveWorkStructList

        self.oneTableView.reloadData()
        //戻したらクリア
        self.saveWorkStructList = []

    }
    //saveボタン
    @objc func sortingSaveClick(_ sender: UIButton)
    {
        //saveしたらクリア
        self.saveWorkStructList = []

        self.editFlag = false
        self.oneTableView.isEditing = self.editFlag

        self.oneTableView.reloadData()
    }
}- 「並び替え」ボタンは、セルを編集モードに変更し「保存」「キャンセル」ボタンを表示させます。
→
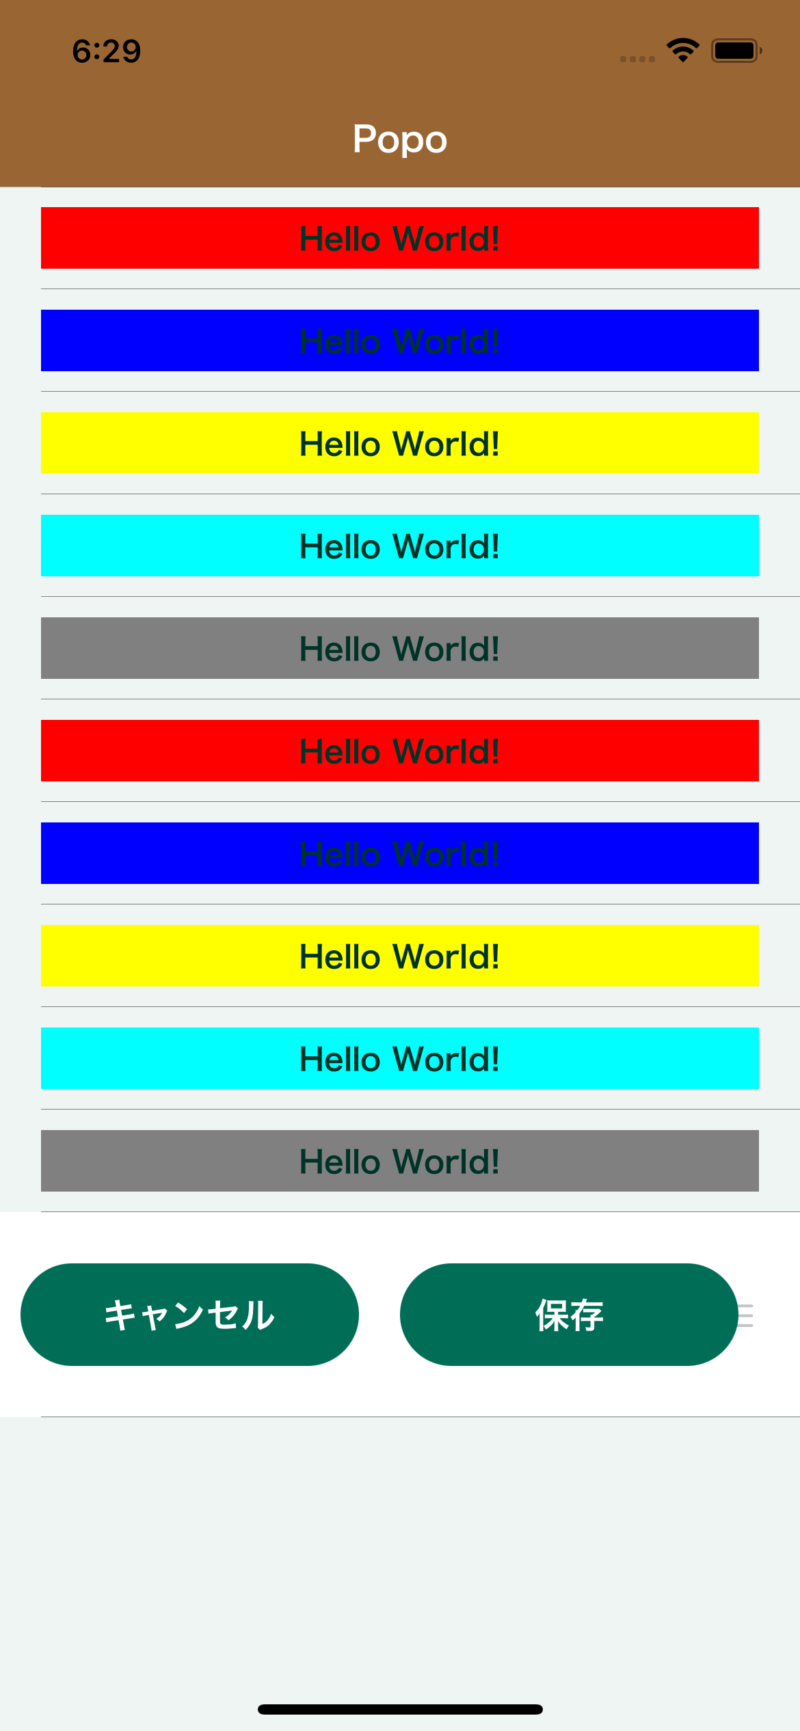
- 「保存」ボタンは、並び替え後の状態を保持します。
- 「キャンセル」ボタンは、並び替えをクリアします。
まとめ

UITableViewの「並び替え」機能について、解説をしました。
基本的な機能をマスタするには、ちょうどよいサンプルではないでしょうか。
UITableViewは、画面作成でよく利用されるViewです。応用機能をマスタをしておくことで、仕事上もスキルアップできると思いますので是非マスタしてほしいですね!

それではまた!


